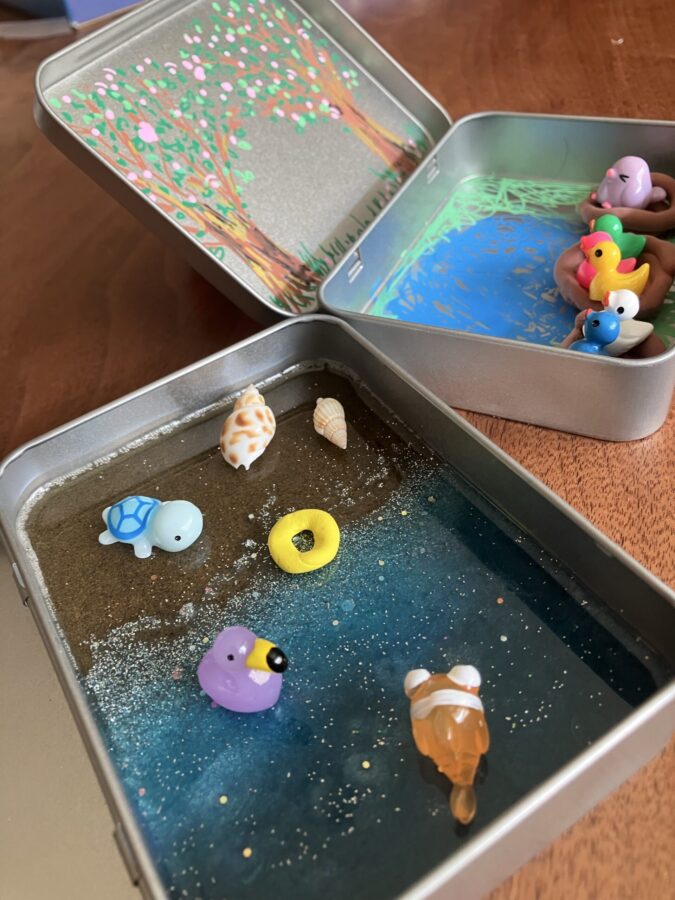
Did you love Polly Pocket as a kid? Or, was your favorite Micro Machines? Perhaps you are just looking for a toy you can tuck into a pocket or purse. We created these little pocket playsets this summer and then put them into travel bags, purses and our car. Now, we have an easy way to bring a fun quiet toy to the doctor’s office or on a road trip.
Keep reading for instructions and inspiration for making your own sturdy little pocket-sized toys.
Gather Your Tiny Materials
First, let’s begin by gathering the materials for our mini play sets. Hopefully you have some of these objects around the house.
If not… I have included links to Amazon product pages for some of the materials below. If you use these links to buy products, the price you pay remains the same, but we earn a small commission on your purchase. As an Amazon Associate we earn from qualifying purchases, which helps support this blog.
Tins
We contained our little pocket playsets in tins. These are the kind of little metal boxes commonly used to hold breath mints or tea. If someone in your house has just polished off some mints, grab those tins and upcycle them into a minuscule doll apartment.
We ended-up purchasing our tins from Amazon. Here are the two types we bought:
Smallish plain tins with hinged lids. These are about 3.3 by 4.5 inches and are less than an inch in height. They are great for little resin animals, but we also wanted tins that could fit toys with a bit more height, so we got…
Colorful hinged tins with a rolling latch. These are ever so slightly larger in length and width, but more than an inch deeper.
Tiny Animal or Doll Figures
I know my kids get tiny little toys from birthday party goody bags and dentist prize baskets. They seem to accumulate in the nooks and crannies of our house, which is what inspired me to make these pocket playsets. Maybe your kids get those toys too. If not, or if you just want to see the types of things we used, take a look at the product links below. You do not need ALL of these. Just choose what works for you.
Product Links to Miniature Figures
100 miniature resin animals. Yes, we have mini erasers and tiny squishy animals around our house, but I did buy this pack of 100 mini resin animals. I liked the variety and thought it would give us some fun ideas for our playsets.
Tiny teasets. I also bought this pack of tiny resin tea sets. I liked how each set was not a teapot and cups molded onto a tray: every piece is actually separate and playable. These are a bit large in scale for the resin animals (although I admit I do not know how ducks take their tea, so they might be just right), but we used them for…
Small Disney princess dolls. Our set is an older version of this one, so I cannot guarantee that these will fit in the smaller tins, but they sure look like they would. (You can see how we made a home for our Cinderella later in this post)
Pocket-sized plush bunny. I got this little cutie for our resident bunny lover. Then, I just removed the keychain. This bunny is a bit too fluffy from the smaller silver tins listed above but fits well in the colorful ones. You might also have good luck with other keychain plushies.
Model Magic. Our kids like creating with this air dry clay, and we use it for lots of projects. In this case, we used it to make food, floaties and other props for our playsets. Like the next item on this list, I recommend this is a fun creative supply to regularly keep on hand. It even comes out when friends are over.

Markers or Paint
What makes this a good project for kiddos is that the DIY-ing basically just involves imagination plus markers.
Posca paint markers. We opted for the best of paint and markers with these paint markers. We like using these for lots of DIY projects (like painted rocks or repairing Hot Wheels paint). Just keep in mind that they can stain, so cover your work surface and wear clothes you do not mind dirtying, just as you would while painting.
You could also opt for acrylic paint or permanent markers. Unfortunately, washable markers are not going to have the staying-power we need for these tins.
A Great But Not Necessary Crafting Tool
And speaking of crafting tools we use often, for our little Cinderella suite, I used a Cricut machine and vinyl for the decor. If you have these items, they make for a nice finish. Plus, you could use Cricut’s removable vinyl to give yourself the option of changing-out your pocket play set’s decor. If you do not have a Cricut or other cutting machine, just use those markers or paints!
If you are interested, this is newest version of the machine I use.
…And Additional Optional Materials for making a beach scene
In this post, you will see that I created a beach playset using resin, sand and some mica powder. This is a more complicated and time-intensive version of this playset project. I would recommend starting with the other materials and playset types first. But if you are already comfortable with resin or want to give it a try, you will need:
Resin. I used an epoxy resin like this one.
Sand. You probably have an idea about where you can get this. Honestly… I shook out our beach tent to collect some from our last beach day.
Blue mica powder. I would suggest a darker and lighter shade to get a nice swirl effect. I haven’t tried this set, but I like that it has a range of blues.
Some silver glitter for creating a wave effect. Any old silver glitter will do. I am not even going to try to recommend any one in particular.

Create Your Pocket Play Sets
Now this section is going to be shorter than the materials section, because you will probably get your fun supplies in front of you and just start crafting without any extra help from me. This is a very forgiving DIY project with no rules. Just make sure everything fits. And if you are using glue or resin, keep it off the hinges and edges so that your tins can still open and close freely.
Here are the basic steps.
Choose Your Pocket Pals
I like to start by deciding who will live in each little pocket playset. This will determine the environment or decor. Just make sure your little creatures or dolls can fit in your tin when it is closed, and then decide how many figures should reasonably go in each tin.
It is nice to have multiple figures in one pocket playset, so that they can interact with one another. But if you have too many figures, the tin might become hard to close and then tiny toys can are easily lost.

For example, my kids gathered up a bunch of resin birds of different colors. Then, they thought about what kind of environment that rainbow of birds might like. They decided on a meadow, trees and some little nests.

Our Cinderella figure takes up almost the entire length of her tin, so we knew we were not going to be building a whole world for her. We decided to turn the bottom of the tin into a cozy bed. Then we added a few moveable accessories so her “world” could expand beyond the tin.

We noticed we had several sea creatures and even some tiny seashells, so we decided those would go in an ocean playset. Our domesticated animals and tiny carrots would become a farm.
You get the idea. Start with the tiny creatures who will live in your tin, and decide what they need, so that you can create their world in the next step.
Color, Paint, Cut and Shape Your Scenery
After you have selected the residents, it is time to create their environment. You can color anywhere on the tin. If you are using those Posca paint markers, just make sure to leave some drying time between stages. What follows are two approaches we took to creating pocket playsets.
You can see that my kids colored a meadow for the bird family you saw above with the paint markers. Then they shaped some little custom nests out of brown air dry clay (links for both of those product are in the materials list above). While they were working on the nests, I sketched some flowering trees onto the open lid. This was a relatively easy pocket play set to create, and my kids loved it.

Cinderella’s suite took a bit more work, but it does not need to be that way. I stitched-up some bedding for Cinderella, but you could just as easily use some unfinished scraps or raid your doll supplies. We covered the walls of Cinderella’s suite with colorful vinyl I cut on my Cricut. But here again, you can skip the complicated Cricut color those designs directly onto the tin. To make the set a little versatile, I added a tea set from the Amazon packet I linked above, and my kids created some Model Magic treats for Cinderella.
You can see who these pocket play sets can work with your imagination and the supplies you have on hand! You can see in the photo below that we got really creative and made a magical stream with lots of glitter and resin as well as our paint markers. Keep reading for more on using resin.

A More Advanced Ocean Pocket Playset
We had some resin and the stowaway sand I mentioned earlier, so we decided to get a little fancy and make an ocean scene. Again, you can just as easily create an ocean scene with paint or markers, but I decided to try some resin. Before I being sharing my process, I want to acknowledge that there are so many very gifted resin artists out there. I am not one of them. I am very new to using resin. I am sharing my process for making these beach playsets below, but I am sure you can improve upon it.
Creating the Beach
I mixed one batch of resin following the directions on the bottle. The batch was about 20ml total, but I probably could have used even less. You can adjust for your tin. The good news is that this project does not require much resin: a thin coating is fine, and it makes the playset lighter to carry around.
Once the resin and hardener were fully combined (but still liquid), I added roughly a teaspoon of sand. If you are doing this project, try to make sure your sand is free of organic matter for the best results.

Once my sand resin was ready to pour, I propped one short end of my tin on a chopstick. This created just the slightest incline. You can also use a couple of quarters for this. I poured my sandy resin at the halfway point in the tin. Once it settled into place, I had a half sandy tin and slightly sloped beach. I left this to dry and cure for twenty-four hours.

Adding the Ocean
The next day, I mixed another 20ml batch of resin according to the package instructions. Once the resin was fully mixed, I added just a little light blue resin and throughly mixed it into the resin.
This time, I placed my tin (with a hard sandy beach) on a flat surface. I poured my blue water into the empty far side of the tin. As the liquid resin spread, it came part way up the beach, just like an ocean wave. I let it settle for a few minutes.

To add the appearance of depth, I added a tiny pinch of dark blue mica powder to the “deeper” part of the water and swirled it in with a toothpick. Next, I sprinkled silver glitter along the “water” reaching onto the beach to create a kind of magical foam.
Again, I let the whole ocean scene dry for a day. You can see the finished result below. You can also see another ocean tin we made complete with animals and a little inner tube we fashioned out of clay.

Would anyone mistake these for an actual beach? Of course not, but it is a kind of magical sparkling one that I think is really nice for play. I hope it inspires you to play with your own ideas for pocket playsets. As I said, there are some truly accomplished resin artists, and I am sure you can improve on my amateur technique.

What to Do with Your Pocket Play Tin
Once your paint or resin has dried, you have a little pocket-sized play set! How cool is that? You can tuck it into your purse or backpack for waiting room emergencies or add it to your travel bag. They are great because they are self-contained toys that tuck into just about any little spot. Plus, the tins make them really pretty tough. I love our pocket playsets because the kids used their imaginations to create them, and they use their imaginations to play with them. I hope you can have some fun with this idea too.

Thank you for reading this post on DIY miniature playsets.
For more ideas for simple family fun, please explore our section At Home Fun. If you like working with miniature toys, we especially encourage you to take a look at Bring This Easy Christmas Tradition Home on a Small Budget. Thanks again for reading!