A few years ago I got my hands on some clear iron-on vinyl. I cannot even remember why I picked it up from the fabric store. I think I was trying to waterproof a first-aid pouch for our diaper bag. In any case, I got the vinyl home, and realized it could be used on not just fabric, but paper as well. I immediately started imagining all of the things I could do with the vinyl. I found photos online of zipper pouches made out of chip and candy bags. Cute, but I do not have a great affection for chips and candy, so that was not for me. You know what I do have affection for… the Disney parks! I realized I could make a Disney park map zipper pouch!
I have made more fabric zipper pouches than I can count, so I applied my experience with those pouches to vinyl covered Disney parks maps and just kept going. What follows is my step by-step explanation of how you too can make a zipper pouch (or clutch) out of Disney parks maps.
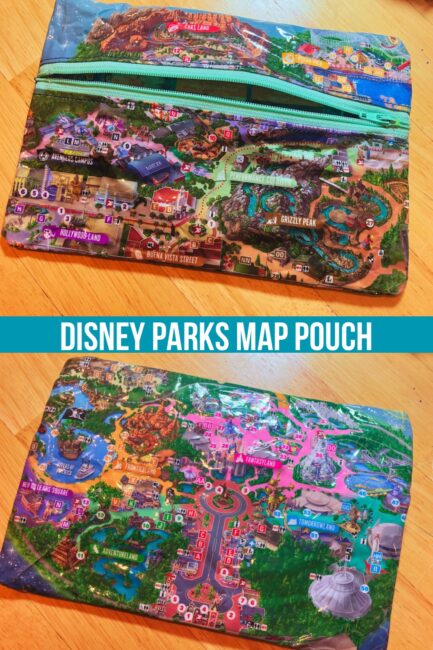
Disney Park Map Zipper Pouch Description
My pouch is about 5.5-inches tall and 8.5-inches wide and shows Disney maps on all sides. I have included instructions for adapting the size if you wish. This is an unlined pouch, so that you can see the maps inside the pouch as well and wipe all surfaces clean with a damp cloth. That means you do not need fabric but only the materials listed below. So let us get started!

What You Will Need
Time to gather your materials to make a zipper pouch from a Disney park map. I have included the materials I used and suggestions for alternatives in some places.
I have also included links to Amazon product pages for some of the materials. If you use these links to buy products, the price you pay remains the same, but we earn a small commission on your purchase. As an Amazon Associate we earn from qualifying purchases, which helps support this blog.
Materials for a Disney Map Zipper Pouch
- Disney park maps! Save your maps from your park visit. You should be able to make a pouch with just one map, but it is nice to have at least two so you can really choose the parts you want to feature. Alternatively, you can use other flat flexible items from your visit like hotel stationary or an event schedule.
- clear iron-on vinyl: For this project I used a 12 by 18-inch piece of Pellon 100R Vinyl Fuse with Gloss Finish. It is a clear vinyl that adheres to the maps when ironed. The link above is for a roll that should be enough for there to four pouches.
- a zipper: Your zipper pouch needs a zipper. In my example below, I use a 8-inch zipper. Get that length to follow my example exactly, or choose your own and I will give you tips for how to adjust. Choose a length to match the desired width of your Disney map zipper pouch.
- cutting mat, ruler & rotary cutter (or scissors and a ruler): When I am cutting for craft projects, I like to use a rotary cutter, cutting mat and a clear ruler. That is what you will see me using here, because I like the straight edges I can achieve quickly. Alternatively, you can use a simple ruler to mark lines on your materials and then cut carefully along those lines with scissors.
- iron or heat press: you will need to fuse your vinyl to your maps with the heat from an iron or heat press. I use a Cricut heat press and mat that is an older version of this one. You may also use an iron and ironing board.
- two pressing cloths: You will need to protect your heat press (or iron) and surface with a pressing cloth. That just means a piece of fabric that will go between the vinyl and the surfaces you do not want it to adhere to. I use two pieces of quilting cotton. You can also use parchment paper.
- sewing machine with a zipper foot: This project requires you to sew straight seams. A zipper foot for your sewing machine will be very helpful in creating these. There is a good chance that your sewing machine came with one.
- thread: Find an all-purpose thread that matches your zipper color or just strikes your fancy.
- wonder clips: You will want to hold your pouch together while sewing it without making unnecessary holes in the vinyl, so I recommend using sewing clips like these to keep everything aligned.
Once you have gathered all of your materials, it is time to start creating your zipper pouch out of a Disney parks map.

Cut Up Your Disney Park Maps
This part is fun! You are going to be cutting up your Disney park maps to create the front and back of your zipper pouch. After this step you will have three pieces. The largest piece will make up the back of your pouch. The two smaller pieces will together make up the front of your pouch with the smallest piece going above the zipper and the other below.
The pouch I am creating in this tutorial uses an 8-inch zipper. If you too are using an 8-inch zipper, follow my cutting instructions in the next section as they are written.
If you are using a zipper of a different length, do not leave! I am going to tell you how to adapt your pieces in the italicized text at the end of this section.
Cut the Back of Your Zipper Pouch From Your Disney Park Map
We will cut the largest piece first: this will be the rectangular back of your zipper pouch (the side without the zipper). If you are using an 8-inch zipper as I am, this piece will be 6-inches tall by 9-inches wide.
I spent a lot of time using my clear rule to figure-out just what 6 by 9-inch chunk of map I wanted for the back of my pouch. I opted for a somewhat centered map view of Disneyland Park. (Actually, I chose an 8-inch zipper particularly because I thought it gave me a nice spread of the map without much empty space.)
Just remember that the edges of our piece will not be visible in your finished pouch, because they will be sewn into your side seams. If you have a certain map feature you want to appear on your pouch, make sure it is about half an inch in from any edge.
Cut the Front of Your Pouch From Your Disney Park Map
Now we will cut the two pieces that will make-up the front of your Disney map zipper pouch. These two pieces will go above and below the zipper. The top piece will be 2 inches tall and 9-inches wide. The bottom piece will be 4-inches tall and 9-inches wide. (Again, these measurements assume that you are using an 8-inch zipper.)
Cut these two pieces from your Disney maps. With all of this cutting, make sure the pieces are oriented the way you would like them to appear in your pouch.

You have now designed the outside of your Disney park map zipper pouch!
Cut Your Vinyl Pieces
Now it is time to cut-out the iron-on vinyl that will preserve and protect the maps of your zipper pouch. We want to encase your cut-out map pieces on the front and back of each piece, so we are going to cut two pieces of vinyl for every one piece of map. This will give us a total of six cut vinyl pieces.
As you measure and cut, leave the vinyl on the paper backing. If you are marking cut-lines, you can draw on this paper.
For an 8-inch zipper, cut the following pieces of vinyl:
- two rectangular pieces of 6.5-inches by 9.5-inches
- two rectangular pieces of 2.5-inches by 9.5-inches
- two rectangular pieces of 4.5-inches by 9.5-inches
You should now have six rectangles of iron-on vinyl on paper backing. This next section with the italicized text details how to adjust the size of your cut pieces to different zippers. You can just skip it if you are using an 8-inch zipper like I am.
>Alternate Instructions Those with Zippers Shorter or Longer Than 8-inches
If you are using a zipper that is not 8-inches wide, you will need to adjust the width of your cut pieces to your zipper. When referring to zipper size, the convention is to measure just the actual zipper and not the fabric or “tape” it is mounted on. Your zipper length goes from the metal stopper on one end to the other.
Each time I refer to zipper length here, I am talking about that measurement from one metal stopped to the other and not the length of the fabric.
Adjust the Width of Your Disney Map Zipper Pouch
All three of your cut-out map pieces should be one inch wider than your chosen zipper. My zipper is 8-inches long, so my map pieces are all 9-inches wide. Yours will be your zipper length plus 1-inch, this is the width for all of your map pieces.
Cut the Back Map Piece for Your Disney Zipper Pouch
You can make the height of your pouch anything you would like. Remember that the finished size of your sewn pouch will be smaller than your cut pieces, because some material will go into the seams. Make the size of your back piece about 1/2-inch taller than the size of the pouch you want.
The piece of your pouch will be as tall as you would like and as wide as your zipper length plus 1-inch.
Cut the Map Pieces for the Front of Your Disney Zipper Pouch
The top piece of the front of your pouch will 2-inches tall and as wide your zipper length plus 1-inch.
Now take the height of your back piece you already cut and subtract 2-inches from the total height. The resulting number will be the height of the piece that will make-up the bottom portion of the front of your pouch. The bottom piece of the front of your pouch will be as tall as your back pieces minus 2-inches and as wide as your zipper length plus 1-inch.
Here is an example: if your zipper is 12-inches long, and you want your pouch to be 11.5-inches tall, your cut pieces will be as follows: a back piece that is 12-inches tall by 13-inches wide, a top-front piece that is 2-inches tall by 13-inches wide and a top-bottom piece that is 10-inches tall by 13-inches wide.
Cut the Iron-on Vinyl Pieces
You will be two pieces of vinyl to encase each one map piece on the front and back sides. This will give you a total of six pieces of vinyl. Each vinyl piece should 1/2-inch taller and 1/2-wider than the corresponding map pieces. So, in my previous example, my vinyl pieces would be two back pieces that are 12.5 by 13.5 inches, two top-front pieces that are 2.5 by 13.5-inches and two top-bottom pieces that are 10.5 by 13.5”
This concludes the special instructions for pouches with zippers that are shorter or longer than 8-inches. You can now follow the regular instructions.

Adhering the Vinyl to the Disney Map Pieces
(You may now want to take a moment to preheat your iron or heat press. I went with 275-degrees on my heat press. Follow the instructions on your vinyl product: mine said a “medium” iron setting.)
Now, sort your map pieces so that each piece is with its matching two vinyl pieces. (Remember, the vinyl will go on the front and back of the map piece to protect it.) You should now have three little piles with one map piece and two vinyl pieces in each pile.
Choose a pile. Peel the paper backing off of one piece of vinyl, and adhere the sticky side of the vinyl to your map piece. This is tricky, so go slowly. You are trying to create about a 1/4-inch border of vinyl on each side of the paper map piece. Try to gently smooth out any wrinkles or bubbles.
Continue this process with the other two piles. You should now have three map pieces with vinyl adhered to one side. You should have three remaining vinyl pieces all of different sizes: set these to the side for now.
Iron Your Vinyl and Map Pieces
It is now time to permanently adhere that vinyl to your map pieces. Pick one piece of map with the vinyl stuck to it to start.
Before you apply heat, I suggest covering your ironing board with a pressing cloth (that vinyl gets sticky) and then placing another pressing cloth on top of your piece. You can also use the paper that you just peeled off the vinyl, but I prefer a wider protective piece in case anything slides.
So, put a pressing cloth on top of your ironing boarding or heat mat. Then, put your first vinyl-plus-map piece on top of the cloth with the vinyl side up. Now place another pressing cloth on top of the whole thing.
Finally, it is time to apply heat. You will want to follow the instructions on your vinyl product. Mine told me to press my iron (heat press) onto my material for 8 seconds. If the piece was larger than the iron, I was supposed to move my iron around in an over-lapping pattern to cover the whole surface with heat. I was then supposed to turn the material over and press for another 4 seconds. The instructions also reminded me to not place my iron directly onto the vinyl.
So, I put my 275-degree heat press on top of my pressing cloth plus vinyl-map plus pressing cloth sandwich for 8 seconds. My heat press was large enough to cover everything at once. I flipped the whole sandwich over and applied another 4 seconds of heat. The vinyl was hot when I finished, so I let it cool before handling it. Time for you to do the same while adjusting to your available materials.
Now repeat this process with the other two vinyl-covered map pieces.

Add the Remaining Vinyl
You should now have three map pieces with vinyl permanently melted onto one side. We now need to add vinyl to the other side to protect the Disney maps and make them resilient enough to be sewn into a zipper pouch.
Match each remaining vinyl-only piece to the vinyl-plus-map piece of the same size and make three little pairs. Choose one of these pairs.
Turn the vinyl-plus-map piece so that the vinyl side is face down and the map-only side is facing up. Peel the paper backing off the matching vinyl-only piece and smooth the sticky side of the vinyl onto the exposed map. Do this carefully and try to match the edges of this new vinyl to the vinyl already on the map. Gently smooth out any wrinkles or bubbles.
Do this with the remaining two pairs.
Now, repeat the ironing process from the previous step. When you are done, you should have three differently-sized Disney parks map pieces each covered in vinyl on the front and back. Great job!

Assemble Your Disney Park Map Zipper Pouch
You now have four pieces that you are going to sew together into a zipper pouch: three cut-out map pieces (now covered in vinyl) and one zipper.
Prepare your sewing machine with your chosen thread and zipper foot and get out those sewing clips
Attach the Zipper to the Top-Front Piece
Find the top-front piece of your bag: this should be the smallest of the three bag pieces, and it is the piece that will go above the zipper. Place this piece so that the “right” side is face-up on your work surface. The “right” side is the side you want for the exterior of your bag. The “wrong” side is the side that will be inside your bag. The wrong side should be face-down on the table, and you should be looking at the piece as you would like to see it on your pouch with the top on top.
Now take your (closed) zipper and flip it face-down onto your top-front piece. You should now be looking at the side of your zipper that will be inside your pouch. Move the zipper so that the fabric bottom of the zipper lines-up with the bottom of the top-front piece. The zipper should now be face-down on top of the right side of the top-front piece with the bottoms aligned. Clip all this together with those sewing clips, and get ready to sew.

Start Sewing Your Zipper
You now have your zipper and top-front piece clipped together, but we need to stitch them together.
Sew a straight-stitch along the length of the zipper to attach it to the bottom of the top-front piece. I like to make the seam about 1/4-inch from the fabric edge of the zipper.
Whenever you are sewing a seam for this pouch, be sure to backstitch at the beginning and end of the seam. This keeps the thread from coming loose, like tying a knot. Many machines will have the option to do this automatically or by pressing a button.
The zipper foot will allow you to get close to the zipper without running over it. You can see that my zipper foot allows me to attach it to one side or the other in order to leave extra room. Your zipper foot might look different, but just set it up so that the foot is not running over the zipper. The stitch should go through the zipper fabric and the top-front map piece so they are completely attached along the bottom edges of both.

Fold The Zipper Flat
Remove the sewn zipper and top-front piece from the machine. Snip any hanging threads.
Now fold the zipper and the top-front piece away from each other, like you are opening a book. Allow the bottom of the top front piece to crease. Flatten everything so that the zipper and the top-front piece are both now face-up. What we were calling the bottom long edge of the zipper is now the top.
Return to your sewing machine and sew another straight-stitch along the zipper. This time, you are trying to preserve that nice crease and the flat piece you just made, so it will go through the folded top-front piece and the zipper fabric together.
Remove the piece and snip any hanging threads.

Attach and Sew the Other Side of Your Zipper
Now place your front-bottom piece (that is the medium sized one) on the table right side up and with the top on top, as if you are looking at the front of your pouch. Take the piece you have just sewn (the top-front piece attached to the zipper) and place it face-down on top of the front-bottom piece. The right sides of the two should be touching each other. Lay the unsewn long-edge of the zipper along the top edge of the front-bottom so that the edges align.
You should now have your front-bottom piece right side-up on the table. The top-front piece with zipper attached should be right-side-down, and the zipper should line-up with the top of the front-bottom piece. Clip all of this together.

Bring this clipped pile to your sewing machine and sew the long edge of the zipper to the top edge of the front-bottom piece about 1/4-inch from the edge.
Take it out of the machine, and snip any hanging threads. Now do what you did with the other side of the zipper. Crease the top-bottom piece to make the whole thing lie flat with all pieces and the zipper now right side-up. Sew the creased sides together as you did on the first piece to keep the whole front piece flat. Snip any hanging threads.

You should now have the entire front side of your bag sewn together. Place it right-side-up on your work surface. Unzip the zipper about three-quarters of the way.
Sew the Back of Your Disney Park Map Pouch to the Front
Take the last and largest of the three vinyl-map pieces and place it face-down on top of the front of your pouch. The right sides of the front and back should be touching each other. Line-up the edges all around.
If either the front or back is larger than the other, just decide how you want to line-up your pieces. Depending on how closely you sewed your zipper, you may have some extra height on one piece or the other. That is okay. Just keep the smaller piece on top when you are sewing to make sure you catch it in your seam.

Now, double-check that your zipper is mostly unzipped, or you will not be able to turn the pouch right-side-out later! If everything looks the way you wish, clip the front and bag pieces together with your sewing clips.
Sew a seam around all four sides of the pouch, placing the seam about 1/4-inch in from the edge. Make sure you are catching both the front and back in your seams while avoiding sewing over any metal zipper parts. Snip any hanging threads.
Your zipper pouch made of a Disney parks map is now complete, but it is inside out. If you assembled everything correctly, you should be looking at the inside of a nicely sewn zipper pouch. One more step to go.
Turn-out Your Disney Park Map Zipper Pouch
Time for the big reveal!
Typically when you sew corners, you will snip them to make them turn-out more neatly. I skip that with these pouches, because I do not want to snip into the seal I made with the vinyl. However, you may wish to cut off excess vinyl at the corners.
In any case, using the opening you left in the zipper, turn your bag right side out. This may take a little finesse, as the vinyl-paper combination is not as flexible as regular fabric, but it will work! Just keep pushing it out. When you are almost done, use a chopstick or something similar to really poke the corners out nicely, and…

You Made a Disney Park Map Zipper Pouch!
Congratulations! You created a zipper pouch from Disney parks maps. I hope you like it and use it well. This could work as a clutch, pencil case or a pouch for little travel essentials. Take it for a spin around Disneyland Resort or Walt Disney World and enjoy the results of your work and creativity.
I do not recommend trying to wash this zipper pouch. Instead spot clean it if it gets dirty. A damp cloth should work well on the slick vinyl surface.
Now that you have the hang of this, make another pouch or too and let your creativity take flight. You can see in the photo below that I had some fun with different sizes, collages pieces and even adding some pool wristbands as hanging straps.

Thanks for reading this post on how to make your own Disney park map zipper pouch (or clutch).
I hope you enjoyed it. For more creative ideas, see Disneyland Costume Inspiration From Our Home to Yours and our Disney movie night ideas here.
If you are packing that pouch for a Disneyland vacation, see our Disneyland Travel Essentials: What You Need to Pack. That is part of our free and complete Step-by-Step Disneyland Prep. Finally, please consider subscribing to our free newsletter below. Thanks again for reading.