We like to use Lightning Lane Multi Pass at Disneyland Resort. As a ticket add-on, it is an extra cost, but we think the pass provides enough value to make the expense worth it. A major reason that we get so much value out of Lightning Lane Multi Pass is that we know how to use it well. We want to share our knowledge with you, so we are taking you through our strategies for Lightning Lane Multi Pass in this multi-part guide.
We started constructing this post as a comprehensive guide to Lightning Lane Multi Pass strategies at Disneyland Resort, including what some guests call “stacking”… and then the word count crept past 4000 words. That is a dizzying amount of information about a line-skipping service, so we decided to split this Lighting Lane Multi Pass guide into parts. This first part focuses on the basics of Lightning Lane Multi Pass. We think that it is importance to understand the fundamentals of this service in order to use it well. The second part covers nine particular strategies for using Lightning Lane Multi Pass well at Disneyland Park and Disney California Adventure Park.
If you would like a general guide to Lightning Lane passes at Disneyland Resort, including Lightning Lane Single Pass and Lightning Lane Premier Pass, please visit this article. For now, here we go with part one in our guide to Lightning Lane Multi Pass at Disneyland Resort.
How Does Lightning Lane Multi Pass Work at Disneyland Resort? The Basics
Lightning Lane Multi Pass is a paid add-on option at Disneyland Resort. It gives you the ability to make advanced reservations for select attractions. Those reservations give you access to priority queues with short wait times. The priority queues are called Lightning Lanes. So, with a Lightning Lane Multi Pass, you have a pass that gives you access to Lightning Lane queues at multiple attractions. Get it?
A Lightning Lane Multi Pass includes a bundle of select attractions. It does not include all of the attractions in either park. For each of these included attractions, you are able to make one reservation per day. You will use the Disneyland app on a mobile device to make those reservations. The reservation is for a one-hour arrival window.
During your reservation arrival window, you will go to the Lightning Lane entrance for your reserved attraction and scan your pass to enter the priority accelerated queue (the Lightning Lane). The wait in that queue is shorter than the wait in the regular standby line, and you should be experiencing the attraction after a brief wait.
How to Purchase a Lightning Lane Multi Pass at Disneyland
To use Lightning Lane Multi Pass, you will need valid admission (a ticket or Magic Key) to one or both parks at Disneyland Resort. You may then add Lightning Lane Multi Pass to your day for an extra cost. Not every attraction at Disneyland Resort is included in the Lightning Lane Multi Pass. We suggest checking the Disneyland website to see which attractions are included in your Lightning Lane Multi Pass before you make your purchase.
Your Lightning Lane Multi Pass applies to whatever Disneyland Resort parks are included in your admission. If you have a one park per day ticket, your Lightning Lane Multi Pass will work on the park you are visiting. If you hold a Park Hopper, your Lightning Lane Multi Pass will work at both parks. The price you pay for the Lightning Lane Multi Pass is the same whether you are using it in one or two parks.
You can buy your Lightning Lane Multi Pass before or during your visit to the parks. Let us look at these two purchase options.
Add Lightning Lanes Multi Pass to Your Disneyland Ticket In Advance (Option 1)
You have the option of adding Lightning Lane Multi Pass when you buy your park tickets for Disneyland Resort or by upgrading your tickets at a later date. At the time of your ticket purchase, you should see the option to add Lightning Lane Multi Pass for an extra cost. You can simply add Lightning Lane Multi Pass to your cart and complete your purchase.

If you buy Lightning Lane Multi Pass in advance, it will apply to the full length of your ticket. Whether that ticket is a one-day or multi-day ticket, you will have Lightning Lane Multi Pass for each day. Despite this, Lightning Lane Multi Pass is priced per day: there is currently no discount for purchasing it for multiple days.
For example, imagine you want to buy Lightning Lane Multi Pass at the time you buy your ticket and that the Multi Pass is priced at $32 per day. Adding Lightning Lane Multi Pass would bring an added cost of $32 for a one-day ticket, $64 for a two day ticket (as seen in the screenshot above), $96 for a three day ticket and so on. There is no bulk discount!
Even though Lightning Lane Multi Pass will be applied to every day on your multi-day ticket, you will only be able to make reservations for one day at a time and only on that day itself. We will have more on that later in this post.
There is currently no option to pre-buy Lightning Lane Multi Pass for just part of a multi-day ticket. If you would like to do that, you will need to do so on the day of your visit. Let us look at that option next.
Purchase Lightning Lane Multi Pass On the Day of Your Visit (Option 2)
Maybe you would like to wait until your visit to decide whether you want to purchase Lightning Lane Multi Pass. Or, maybe you want to purchase Lightning Lane Multi Pass for just part of your multi-day ticket. In these situations, you will purchase a ticket after you enter either Disneyland Resort park for the day.
First, you will need to scan into Disneyland Park or Disney California Adventure Park for the day. Once you have entered either park, you will have the ability to add Lightning Lane Multi Pass to your day. This option should show-up immediately upon opening the Disneyland app. (Really, it is hard to miss, but you can also find the purchase option in the app menu, as a banner across your tip board and in several other spots.)

Select the tile that says “Lightning Lane Multi Pass” and follow the prompts. Note that a Lightning Lane Multi Pass is different than a Lightning Lane Premier Pass or a Lightning Lane Single Pass. For an explanation of the differences between the passes, see this post. Once you have completed your purchase, you should have access to the Lightning Lane Multi Pass service.
How to Use Lightning Lane Multi Pass at Disneyland Resort, A Guide
Once you have entered either Disneyland Park or Disney California Adventure Park with your valid admission and Lightning Lane Multi Pass, you are eligible to make your first Lightning Lane Multi Pass reservation. Even if you enter one of the parks before it has officially opened for the day (during the soon-to-be-ended Early Entry for example), you are still able to book a reservation. However, there will not be any reservations offered for times before official park opening.
A quick note here: at Walt Disney World, guests are able to make some Lightning Lane Multi Pass reservations before their visit. This is not the case at Disneyland Resort in California, so do not get tripped-up by this difference. For Disneyland Resort, you may only begin making reservations after you have entered a park for the day and only for that same day. Now, after your initial entry, you can continue making reservations outside a park, but more on that later in this post.
How to Book Your First Lightning Lane Reservation
First, you will want to have the Disneyland app downloaded. (Even if you trip is still far off, we suggest downloading and becoming familiar with the app today. Got it? Okay, moving on.)
Let us imagine you are now inside one of the parks at Disneyland Resort and holding your mobile device.
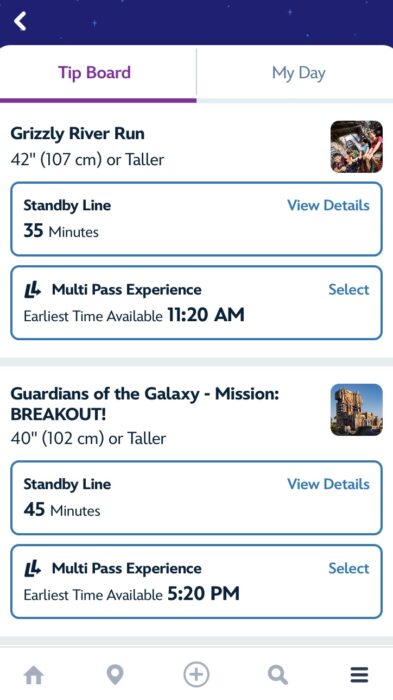
You can book your first Lightning Lane by opening your Disneyland app and going to your “Tip Board.” You can reach this through your “Plan My Day” itinerary on the home screen or by selecting the “plus” (+) symbol at the bottom center of your app screen. From here, you will see a screen with a list of attractions and their available Lightning Lane return times plus their estimated standby wait times.
The app shows you the earliest arrival time for each Lightning Lane eligible attraction, and that is what is available at the moment. You will not be able to select an arrival time other than the one shown in the app. As the day goes on, other arrival times will open.
Select a Lightning Lane eligible attraction, and then select which members of your party will be part of the reservation. (As long as your tickets are linked, you should be able to make Lightning Lane Multi Pass reservations for all or part of your group.) Follow the prompts to complete your reservation.
Your time slot is not held until you have completed the process. In fact, you may notice that your reservation time shifts before you complete the reservation. Pay attention to this final assigned time, and make sure it still works for you.

How to Use Your Lightning Lane Reservation
Your reservation will have a designated arrival window of one hour. At any time during that hour, you may arrive at the Lightning Lane entrance for your reserved attraction. The entrance should be marked by a sign and some scanning stations. Approach one of these stations and scan your pass. As long as you have a valid reservation, the attending cast member should wave you through. If you have trouble, speak to that nearby cast member.
Once through the Lightning Lane entrance, you will travel through the special Lightning Lane queue until it merges with the regular standby queue. At this merge point, a cast member will be mixing the two queues together.
You will still have a short wait to experience your reserved attraction, so this is a good time to quickly make your next Lightning Lane Multi Pass reservation, and here is how to do that…
How to Make Your Next Lightning Lane Reservation
Once you have scanned into your most recent Lighting Lane Multi Pass reservation, you are eligible to make your next reservation. But, what if your reservation is still hours away? If two hours have elapsed since you last booked a reservation, you are also eligible to make your next reservation regardless of whether you scanned into the last one.
For the rest of the day, you can make a new Lightning Lane reservation each time (1) two hours have passed since you last made a reservation OR (2) you scan into the reservation you most recently booked.
For each reservation, follow the same process as you did with your previous reservation. Just remember that you can no longer make a reservation for attractions for which you have previously used a Lighting Lane. In other words, you may only make one Lightning Lane reservation per attraction per day.
It is also important to understand that you can only make reservations for the current day. Even if you have added Lightning Lane Multi Pass to a multi-day ticket, you can only make reservations one day at a time.
Another side-note: at this point in this Lightning Lane Multi Pass guide, you may have noticed that you will still have to do some waiting when using a Lightning Lane Multi Pass. You will need to wait for your reservation windows, and you will need to wait between making reservations. However, while you are waiting for your chance to make and use reservations, you can still do things like experience other attractions or have some food. You are waiting, but it is not in a standby queue, so you can make good use of that time.
Modifying (or Canceling) a Lightning Lane Reservation
If you find you cannot use a reservation at your booked time, you have options. You can either cancel that Lightning Lane reservation or modify it. Just select the problematic reservation and follow the prompts.
If you cancel the reservation, you will be able to make another reservation. You will not have used up the one allotted reservation for that ride for that day.
If you choose to modify the reservation, you can either (1) modify the arrival time for that same attraction or (2) switch your reservation to a different attraction. With the first option—modifying the arrival time for the same attraction—you will be shown the next open reservation arrival window, and you will have the choice to switch to that window.
With the second option, you can choose any Lightning Lane Multi Pass eligible attraction you have NOT already reserved that day. For the new attraction, you will not keep the original arrival time. Instead, you will be offered the next available arrival window just as if you were making a new reservation.
Why Modify a Lightning Lane Reservation?
Making a modification to a reservation is not much different from just canceling a reservation and making a new reservation, except for one important distinction. When you cancel a reservation and make a new one, you reset the clock for that two hour waiting period we mentioned.
When you modify a reservation, you do not reset the clock. Instead, your two hour countdown is still running from the time you initially booked your reservation and not from the time you modified it. You can see why it would be advantageous to always modify rather than cancel, and we will elaborate on that further in our second post on Lightning Lane Multi Pass strategies, so stick with us.

Important Rules for Lightning Lane Multi Pass Reservations
As you can already see, there are specific rules for making reservations with a Lightning Lane Multi Pass. Understanding when you can make reservations will help you do so strategically, so let us emphasize and elaborate upon some of the rules we have already touched upon for Lightning Lane Multi Pass reservations.
Booking Waiting Period Rule
As soon as you scan into your first park of the day, you are eligible to make your first Lightning Lane Multi Pass reservation. In order to make another reservation, you must (1) wait until two hours have passed since you last booked a Lightning Lane reservation OR (2) wait until you have scanned into the Lightning Lane for your most recent reservation.
For example, you enter Disneyland Park at 8:00am and immediately make a 9:30am to 10:30am Lightning Lane reservation for Haunted Mansion. According to the two hour rule, your next chance to make a Lightning Lane reservation will open up at 10:00am. However, if you scan into the Haunted Mansion Lighting Lane at 9:30am, you can make your next reservation at 9:30am, even though only ninety minutes have passed since you last made a reservation.
We really want to emphasize this waiting period rule, because it is key to making the most of your Lightning Lane Multi Pass. Again, you can make a new Lightning Lane Multi Pass reservation either (1) after two hours have passed since your last reservation or (2) after you scan into the Lighting Lane entrance for your most recently booked reservation, whichever comes first.
It is important to understand that the two hour timer will reset AFTER you make your next reservation. It will not automatically reset every two hours. So, if you miss your chance to make a reservation at 10:00am in the example above and instead make your next reservation at 10:30am, you will need to wait until 12:30pm to make your third reservation.
One Reservation Per Attraction Rule
You can only make one reservation per included attraction per day. You will need to use the regular queue if you want to ride a particular attraction again.
For example: imagine that you use your Lightning Lane Multi Pass to reserve a Lightning Lane for Big Thunder Mountain Railroad between 10:15am and 11:15am. You scan into the Lightning Lane entrance with your pass at 10:30am and enjoy your ride on Big Thunder Mountain Railroad. Once you scan in, you have used your only available Big Thunder Mountain Railroad reservation for the day.
You than decide that you want to ride Big Thunder Mountain Railroad again, so you hop into the regular standby queue this time. While you are waiting, you make your next Lightning Lane reservation. Because you have not used your Lighting Lane Multi Pass on Tiana’s Bayou Adventure yet, you make a reservation for the Tiana’s Bayou Adventure Lighting Lane for 2:15pm to 3:15pm.
“Sell-Out” Rule
Disney does not guarantee that you will be able to experience all of the attractions included in the Lighting Lane Multi Pass. There are many attractions, and you may simply run out of time to experience them all in one day. Furthermore, reservations do “sell out,” meaning all of the allotted Lighting Lane reservations for a particular attraction get distributed for the day. When this happens no more reservation are available unless other guests cancel their reservations.
For example: you might attempt to make a Lighting Lane reservation for Indiana Jones Adventure around 2:00pm and see that there are no more reservations left for the day. The attraction’s listing in the Disneyland app will say that the “Multi Pass Experience [is] not currently offered.” Disney does not guarantee that you will be able to get a reservation for Indiana Jones Adventure, and they will not reimburse you for your inability to make a reservation for Indiana Jones Adventure.
However, there is hope, if you are willing to check your Disneyland app often. As other guests cancel reservations, you may see reservations for previously “sold out” attractions open again. If you want to take advantage of these cancellations, refresh the app frequently and snag those reservations as soon as you see them!
Attractions most likely to “sell out” are currently Indiana Jones Adventure, Space Mountain and Tiana’s Bayou Adventure in Disneyland Park. Matterhorn Bobsleds can sometimes also run out of reservations early. Across the way at Disney California Adventure, Guardians of the Galaxy – Mission: BREAKOUT! is usually the first to sell out.

Rolling Reservation Rule
Making Lighting Lane reservations is not like making a reservation at a restaurant: you will not be able to choose from a variety of reservation times. As you make your reservation, the Disneyland app will offer only the next available reservation time for each Lighting Lane attraction. If you want a different time, you will need to wait.
For example: it is 10:00am, and you are looking to make a reservation for Space Mountain. When you open the Disneyland app, you see that the Lightning Lane reservation being offered for Space Mountain right now is for 12:45 to 1:45pm. You are concerned that this might conflict with your lunch reservation at Blue Bayou, so you prefer to not make that Lightning Lane reservation.
You have a few options. First, you can simply watch the app and wait until a better Space Mountain reservation time comes up: as other guests make reservations, the next available time will shift. So, you could wait until the reservation time changes to 2:00pm to 3:00pm and take that reservation.
Alternatively, you can choose to reserve a different ride with a better arrival time—like picking 10:30am to 11:30am for Autopia. Finally, you can choose the 12:45 to 1:45pm time you do not like for Space Mountain and plan to modify it later if needed.
We do not recommend going with that first option from that Space Mountain example, and we will go into why this is the case in part two of our Lightning Lane Multi Pass strategies.
Rules About Making Reservations Outside of the Parks
You already know that you must enter either Disneyland Park or Disney California Adventure Park to make your first Lightning Lane Multi Pass reservation for the day. But here is a twist: after you do that, you do not need to be in a park to make reservations.
In order to use Lightning Lane Multi Pass on any given day, you do need to activate it by scanning through the entrance gates. Once you have entered one of the parks, you are then able to book Lightning Lane reservations for the rest of the day, regardless of where you are.
Here is an example. You enter Disneyland Park at 9:00am. You have added both a Lightning Lane Multi Pass and a Park Hopper to your ticket. Immediately, you book a Lightning Lane reservation for Space Mountain with an arrival time of 11:00am to 12:00pm.
At 11:00am, you scan into Space Mountain, and you look at your choices for your next reservation.
You decide to ride Toy Story Midway Mania next, so you make a reservation with an arrival window of 12:30pm to 1:30pm. After riding Space Mountain, you exit Disneyland Park and enter Disney California Adventure Park. You use your reservation to ride Toy Story Midway Mania.
After Toy Story Midway Mania, you go to your hotel for a little break. While you are at the hotel, you make your next reservation for Matterhorn Bobsleds at 4:00 to 5:00pm.
Now, this scenario is probably not the most efficient plan for using Lightning Lane Multi Pass (check-out part two of this series for tips about that), but it does help us illustrate some of the rules about how Lightning Lane Multi Pass can be used. So, let us explore why you were able to make those reservations.
Using Lightning Lane Multi Pass with Park Hopper
In the example above, you made a reservation for Toy Story Midway Mania while you were in Disneyland Park. This is significant, because Toy Story Midway Mania is in Disney California Adventure Park. You were able to make the reservation because you had a Park Hopper. A Park Hopper is a ticket option that gives you valid admission to both parks in one day rather than just one park.
A Lightning Lane Multi Pass is an add-on to whatever valid admission you hold, so it works for the parks included in that admission. Lightning Lane Multi Pass costs the same whether you are using it with a one-park ticket or a Park Hopper.
If you have a one-park ticket plus Lightning Lane Multi Pass, then you can make Lightning Lane reservations for the one park you are visiting that day. If you have a Park Hopper and a Lightning Lane Multi Pass, you can make reservations for both parks. You do not need to be in a particular park to make a reservation for a ride there.
There is one restriction. Guests with Park Hoppers must start in the park where they have made a park reservation for the day. It is only after 11:00am that guests with Park Hoppers are able to switch parks freely. Accordingly, you cannot make reservations for your second park of the day for a time before 11:00am.
A quick tip: if you are having trouble seeing the available reservations for the other park, select “Change Park” at the top of your tip board (below the park name and date).

Making Lightning Lane Multi Pass Reservations At Your Hotel and Other Spots Outside of the Disneyland Resort Parks
In our previous example, we also presented a scenario where you made a reservation for Matterhorn Bobsleds (an attraction in Disneyland Park) from your hotel room. It is absolutely possible to make a Lightning Lane Multi Pass reservation from outside of the Disneyland Resort parks.
Once you have entered one of the parks for the day with valid admission and a Lightning Lane Multi Pass, you can make your Lightning Lane reservations from anywhere including Downtown Disney District, a Disneyland Resort Hotel or another hotel. Just make sure you get back to the parks for your reservation!
Thank you for reading this extensive guide to Lightning Lane Multi Pass fundamentals for Disneyland Resort.
We hope you have found this article helpful. For an overarching look at saving time in line, check-out our article Maximize Your Disneyland Experience: Beat the Lines & Save Time. That article is part of our larger Step-by-Step Disneyland Prep, which we strongly recommend for anyone planning a Disneyland Resort visit. For an overall guide to Lightning Lanes, see Disneyland Lightning Lanes: How to Super-Charge Your Visit.
Ready for the second part of this series where we jump into advanced strategies for making the most of your Lightning Lane Multi Pass at Disneyland Resort? Find it at this link: Ride More: 9 Strategies for Lightning Lane Multi Pass at Disneyland Finally, please consider subscribing to our free newsletter below to get future posts right in your inbox.